
The Power of Delegated Authorization: How OAuth 2.0 Builds Digital Trust
Imagine you're a patient at a trusted healthcare provider—let's call it HealthCare Trust. They've been your primary care provider for years, and they maintain your complete medical records: your health history, lab results, prescriptions, and treatment plans. Now, you want to use a new wellness tracking app—WellnessTracker—that promises to help you monitor your health and provide personalized insights. WellnessTracker needs access to your health records to provide its service.
But here's the problem: you don't want to give WellnessTracker your HealthCare Trust username and password. That would be like giving them unrestricted access to your entire medical history. What if WellnessTracker gets hacked? What if they misuse your credentials? What if you want to revoke access later?
This is exactly the problem that OAuth 2.0 solves. It's a protocol that allows WellnessTracker to access your HealthCare Trust information without ever seeing your password. Instead, HealthCare Trust issues special, limited-access tokens that WellnessTracker can use on your behalf—tokens that you control, can see, and can revoke at any time.
In this article, we'll explore OAuth 2.0 through this story of three entities working together, then dive into the technical details with sequence diagrams, historical context, and a practical example using GitHub's OAuth 2.0 implementation.
The Three Actors in Our Story
Every OAuth 2.0 exchange involves three key players, each with a specific role:
1. The Resource Owner (You, the Patient)
In our story: You, the patient who wants to use WellnessTracker.
In OAuth 2.0: The entity that owns the protected resource (your health records) and can grant access to it. This is typically an end-user, but it can also be an organization or application.
What you want: To use WellnessTracker's health monitoring features without compromising your medical data security.
What you control: You decide what information WellnessTracker can access, for how long, and you can revoke access at any time.
2. The Client Application (WellnessTracker)
In our story: WellnessTracker, the wellness tracking app you want to use.
In OAuth 2.0: The application that wants to access protected resources on behalf of the resource owner. This could be a web application, mobile app, desktop application, or even another service.
What WellnessTracker wants: Access to your lab results and health history to provide personalized wellness insights.
What WellnessTracker needs: A way to access your data without handling your password, and a way to refresh that access when needed.
3. The Authorization Server (HealthCare Trust's Identity Service)
In our story: HealthCare Trust's identity and access management system—the part of the healthcare provider that handles authentication and authorization.
In OAuth 2.0: The server that issues access tokens to the client after successfully authenticating the resource owner and obtaining authorization. This is often the same organization as the resource server, but they're logically separate.
What HealthCare Trust provides:
- Authentication: A secure way to authenticate you (verify you are who you say you are)
- Authorization: A way for you to authorize WellnessTracker to access specific information
- Limited-scope tokens: Tokens that WellnessTracker can use to access only what you've approved
- Token refresh: Capabilities so WellnessTracker doesn't need to ask you repeatedly
What HealthCare Trust protects: Your credentials, your privacy, and your ability to control access.
The Resource Server (HealthCare Trust's Data API)
While not always counted as a separate "actor," there's a fourth component: the Resource Server—the API that actually holds your health records. In our story, this is HealthCare Trust's backend systems that store medical records, lab results, and treatment history. The Resource Server validates tokens issued by the Authorization Server before allowing access to protected resources.
Why We Need This: The Problem OAuth 2.0 Solves
Before OAuth 2.0, applications had few good options for accessing user data from other services:
The Password Anti-Pattern
The old way: WellnessTracker would ask you to enter your HealthCare Trust username and password directly into their app. WellnessTracker would then log in as you and scrape your health records.
Why this is terrible:
| Problem | Impact |
|---|---|
| Security risk | WellnessTracker now has your full credentials. If they're hacked, attackers get everything |
| No granular control | WellnessTracker gets access to everything—you can't limit them to just lab results |
| Revocation nightmare | To revoke access, you'd have to change your password, which breaks access for all other apps |
| Audit impossibility | HealthCare Trust can't distinguish between you logging in and WellnessTracker logging in as you |
| Compliance issues | Sharing passwords violates most security policies and regulations, especially in healthcare |
The OAuth 2.0 Solution
OAuth 2.0 solves all these problems by introducing delegated authorization:
| Solution | Description |
|---|---|
| No password sharing | WellnessTracker never sees your HealthCare Trust password |
| Granular permissions | You can grant WellnessTracker access to "read lab results" but not "modify prescriptions" |
| Easy revocation | You can revoke WellnessTracker's access instantly without changing your password |
| Clear audit trail | HealthCare Trust knows exactly when WellnessTracker accesses your data and why |
| Time-limited access | Tokens expire, requiring periodic re-authorization |
The OAuth 2.0 Flow: Our Story Unfolds
Let's walk through exactly what happens when you connect WellnessTracker to your HealthCare Trust account. This is the Authorization Code Flow, the most common and secure OAuth 2.0 flow for web applications.
Act 1: The Initial Request
You open WellnessTracker and click "Connect Health Records." WellnessTracker needs to know which healthcare provider you use, so you select "HealthCare Trust" from a list.
What happens technically:
- WellnessTracker redirects your browser to HealthCare Trust's authorization server
- The redirect includes the following parameters:
| Parameter | Description |
|---|---|
client_id | WellnessTracker's unique identifier (like a business license number) |
redirect_uri | Where HealthCare Trust should send you back after authorization |
scope | What WellnessTracker wants access to (e.g., "read:lab_results read:health_history") |
response_type | "code" (indicating WellnessTracker wants an authorization code) |
state | A random string to prevent CSRF attacks |
GET /authorize?
  client_id=budgetwise_app_12345&
  redirect_uri=https://budgetwise.com/callback&
  scope=read:transactions%20read:balance&
  response_type=code&
  state=xyz789randomstring
Act 2: Authentication and Authorization
Your browser arrives at HealthCare Trust's login page. You enter your username and password—but notice: WellnessTracker never sees these credentials. You're logging directly into HealthCare Trust's website.
After you authenticate, HealthCare Trust shows you an authorization screen:
WellnessTracker wants to access your HealthCare Trust records
- Read your lab results
- Read your health history
[Allow] [Deny]
This is informed consent—you see exactly what WellnessTracker wants to do. You click "Allow."
What happens technically:
- HealthCare Trust verifies your credentials (authentication)
- HealthCare Trust records your consent (authorization)
- HealthCare Trust generates a temporary authorization code (valid for only a few minutes)
- HealthCare Trust redirects you back to WellnessTracker with the authorization code
GET https://budgetwise.com/callback?
  code=auth_code_abc123xyz&
  state=xyz789randomstring
Act 3: The Token Exchange
WellnessTracker receives the authorization code. But here's the crucial part: the authorization code alone is useless. WellnessTracker must exchange it for an access token, and to do that, WellnessTracker must prove its identity using a client secret that only WellnessTracker and HealthCare Trust know.
What happens technically:
- WellnessTracker makes a secure, server-to-server request to HealthCare Trust's token endpoint
- WellnessTracker includes the following parameters:
| Parameter | Description |
|---|---|
| Authorization code | The code received from the authorization response |
client_id | WellnessTracker's unique identifier |
client_secret | Secret key proving it's really WellnessTracker |
redirect_uri | Must match the one from Act 1 |
POST /token HTTP/1.1
Host: healthcaretrust.com
Content-Type: application/x-www-form-urlencoded

grant_type=authorization_code&
code=auth_code_abc123xyz&
client_id=wellnesstracker_app_12345&
client_secret=secret_key_only_wellnesstracker_knows&
redirect_uri=https://wellnesstracker.com/callback
HealthCare Trust validates everything:
- Authorization code is valid and not expired
- Client ID matches
- Client secret is correct
- Redirect URI matches
- Authorization code hasn't been used before (one-time use)
If everything checks out, HealthCare Trust responds with tokens:
{
  "access_token": "eyJhbGciOiJSUzI1NiIsInR5cCI6IkpXVCJ9...",
  "token_type": "Bearer",
  "expires_in": 3600,
  "refresh_token": "refresh_token_xyz789",
  "scope": "read:lab_results read:health_history"
}
Act 4: Accessing Protected Resources
Now WellnessTracker can use the access token to read your health information. WellnessTracker makes API calls to HealthCare Trust's resource server, including the access token in the request.
What happens technically:
- WellnessTracker requests your lab results
- WellnessTracker includes the access token in the
Authorizationheader - HealthCare Trust's resource server validates the token
- If valid, HealthCare Trust returns the requested data
GET /api/v1/lab_results HTTP/1.1
Host: api.healthcaretrust.com
Authorization: Bearer eyJhbGciOiJSUzI1NiIsInR5cCI6IkpXVCJ9...
{
  "lab_results": [
    {
      "date": "2025-01-10",
      "test": "Blood Glucose",
      "value": 95,
      "unit": "mg/dL"
    },
    {
      "date": "2025-01-09",
      "test": "Cholesterol",
      "value": 180,
      "unit": "mg/dL"
    }
  ]
}
Act 5: Token Refresh
After an hour (or whatever the token lifetime is), the access token expires. Instead of asking you to authorize again, WellnessTracker can use the refresh token to get a new access token automatically.
What happens technically:
- WellnessTracker requests a new access token using the refresh token
- HealthCare Trust validates the refresh token
- HealthCare Trust issues a new access token (and optionally a new refresh token)
POST /token HTTP/1.1
Host: healthcaretrust.com
Content-Type: application/x-www-form-urlencoded

grant_type=refresh_token&
refresh_token=refresh_token_xyz789&
client_id=wellnesstracker_app_12345&
client_secret=secret_key_only_wellnesstracker_knows
This allows WellnessTracker to maintain access without repeatedly bothering you, while you retain the ability to revoke access at any time.
The Complete Sequence Diagram
Here's the complete OAuth 2.0 Authorization Code Flow visualized:
sequenceDiagram
    participant User as Resource Owner<br/>(You)
    participant Browser as User's Browser
    participant Client as Client App<br/>(WellnessTracker)
    participant AuthServer as Authorization Server<br/>(HealthCare Trust)
    participant ResourceServer as Resource Server<br/>(HealthCare Trust API)

    User->>Browser: Opens WellnessTracker
    Browser->>Client: Clicks "Connect Health Records"
    Client->>Browser: Redirect to HealthCare Trust<br/>(with client_id, scope, state)
    Browser->>AuthServer: GET /authorize?...
    AuthServer->>User: Show login page
    User->>AuthServer: Enter credentials
    AuthServer->>User: Show consent screen
    User->>AuthServer: Click "Allow"
    AuthServer->>Browser: Redirect with auth code<br/>(code=abc123, state=xyz)
    Browser->>Client: GET /callback?code=abc123&state=xyz
    Client->>AuthServer: POST /token<br/>(code + client_secret)
    AuthServer->>Client: Return access_token + refresh_token
    Client->>ResourceServer: GET /api/lab_results<br/>(Authorization: Bearer token)
    ResourceServer->>Client: Return health data
    Client->>Browser: Display wellness insights
    Browser->>User: See health analysis

    Note over Client,AuthServer: Later, when token expires...
    Client->>AuthServer: POST /token<br/>(refresh_token)
    AuthServer->>Client: Return new access_token
How Each Actor Benefits
Understanding why each party participates helps explain OAuth 2.0's success:

Benefits for You (Resource Owner)
OAuth 2.0 provides significant advantages for you as the resource owner. Your password never leaves HealthCare Trust's systems, eliminating the risk of credential theft from third-party applications. You maintain complete control over your data with the ability to revoke access instantly without changing your password.
- Security: Your password never leaves HealthCare Trust's systems
- Control: See exactly what each app can access and revoke access instantly
- Convenience: One login enables many services
- Privacy: Grant limited access (e.g., "read only") instead of full record access
- Auditability: See which apps accessed your data and when
Benefits for WellnessTracker (Client Application)
OAuth 2.0 eliminates the burden of credential management for WellnessTracker. The application never handles passwords, dramatically reducing liability and security risks while building user trust.
- No credential management: Never handle passwords, reducing liability
- User trust: Users are more willing to connect accounts when they don't share passwords
- Compliance: Helps meet security and privacy regulations (especially HIPAA in healthcare)
- Scalability: Support thousands of users without managing their credentials
- Standardization: One implementation works with many providers
Benefits for HealthCare Trust (Authorization Server)
HealthCare Trust benefits from OAuth 2.0 in multiple ways. Users' passwords stay within HealthCare Trust's control, never exposed to third-party applications, reducing the attack surface and maintaining system integrity.
- Security: Users' passwords stay within HealthCare Trust's control
- Compliance: Clear audit trails meet regulatory requirements (HIPAA, etc.)
- User experience: Patients can safely connect to third-party wellness services
- Ecosystem: Enables an ecosystem of health apps that drive patient engagement
- Control: Can revoke access to misbehaving apps instantly
A Brief History: The Evolution of Authorization Standards
OAuth 2.0 didn't emerge in a vacuum. It's the result of decades of evolution in authentication and authorization standards. The timeline below shows how we progressed from enterprise-focused SAML to the modern OAuth 2.0 and OpenID Connect standards that power today's web applications.
timeline
    title Evolution of OAuth
    section 1990s-2000s
        SAML : Enterprise SSO emerges
             : XML-based authentication
             : Standardized in 2005 (SAML 2.0)
             : Widely adopted for enterprise federation
    section 2007-2010
        OAuth 1.0 : Created by Twitter, Google, others
                  : Designed for API access delegation
                  : Complex signature requirements
                  : RFC 5849 (2010)
    section 2012
        OAuth 2.0 : RFC 6749 published
                   : Simplified flows with bearer tokens
                   : Multiple grant types
                   : Refresh tokens introduced
    section 2014-Present
        OpenID Connect : Built on OAuth 2.0
                                    : Adds identity layer (ID tokens)
                                    : PKCE for mobile apps
                                    : Device flow for IoT
                                    : Ongoing evolution and enhancements
SAML (2000s) solved enterprise SSO but was complex and XML-heavy. OAuth 1.0 (2007-2010) introduced API delegation but required cryptographic signatures on every request, making it difficult to implement. OAuth 2.0 (2012) simplified the protocol dramatically with bearer tokens and multiple grant types, trading some security for usability. OpenID Connect (2014) added an identity layer on top of OAuth 2.0, providing both authentication and authorization. Today, most "OAuth 2.0" implementations actually use OpenID Connect, and the protocol continues to evolve with enhancements like PKCE for mobile apps and device flows for IoT.
OAuth 2.0 Grant Types: Different Flows for Different Scenarios
OAuth 2.0 defines several grant types (authorization flows) for different use cases:
1. Authorization Code Flow (Most Common)
Use case: Server-side web applications (like WellnessTracker)
Security: Highest—client secret never exposed to browser
Flow: As described in our story above—authorization code exchanged server-to-server for tokens
2. Authorization Code Flow with PKCE
Use case: Mobile apps and single-page applications (SPAs)
Security: High—uses code verifier/challenge instead of client secret
What is PKCE: Proof Key for Code Exchange—a cryptographic technique that prevents authorization code interception attacks
// Client generates a code verifier (random string)
const codeVerifier = generateRandomString(128);

// Client creates a code challenge (SHA256 hash)
const codeChallenge = base64URLEncode(sha256(codeVerifier));

// Authorization request includes code_challenge
// Token exchange includes code_verifier
// Server verifies: sha256(code_verifier) === code_challenge
3. Client Credentials Flow
Use case: Machine-to-machine communication (no user involved)
Example: WellnessTracker's backend service accessing HealthCare Trust's public API for health statistics
Flow: Client authenticates with client_id and client_secret, receives access token directly
4. Device Code Flow
Use case: Devices with limited input capabilities (smart TVs, printers)
Flow: Device displays a code, user enters it on another device to authorize
5. Resource Owner Password Credentials (Not Recommended)
Use case: Legacy migrations, highly trusted first-party apps
Security: Low—requires sharing password (defeats OAuth's purpose)
Status: Generally discouraged; use Authorization Code flow instead
Practical Example: GitHub OAuth 2.0 Integration
Let's see OAuth 2.0 in action with a real-world example: integrating GitHub authentication into a web application. GitHub is an excellent example because it's widely used, well-documented, and follows OAuth 2.0 best practices.
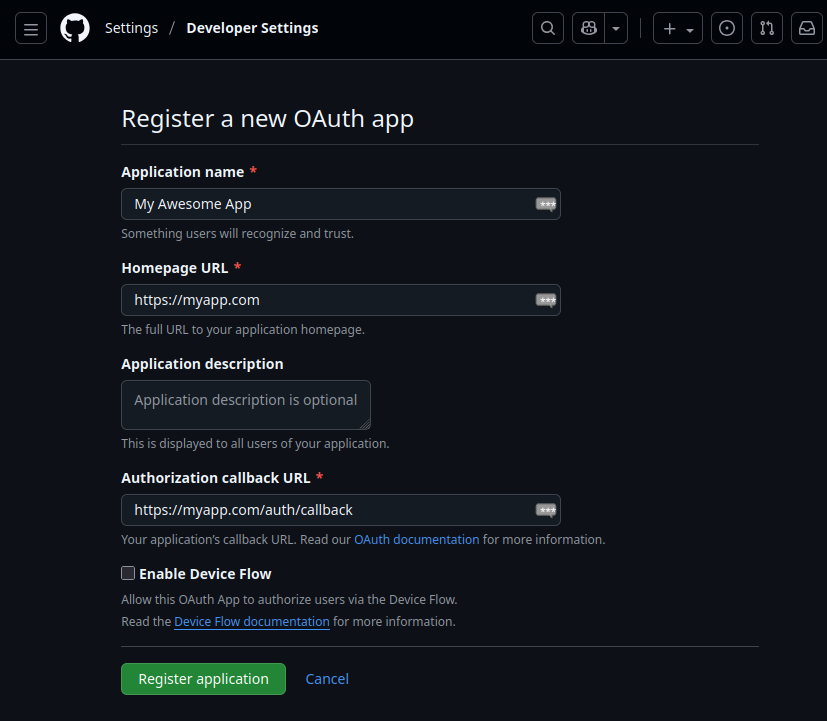
Step 1: Register Your Application
First, you need to register your application with GitHub to get a client_id and client_secret:
- Go to GitHub Settings → Developer settings → OAuth Apps
- Click "New OAuth App"
- Fill in the following fields:
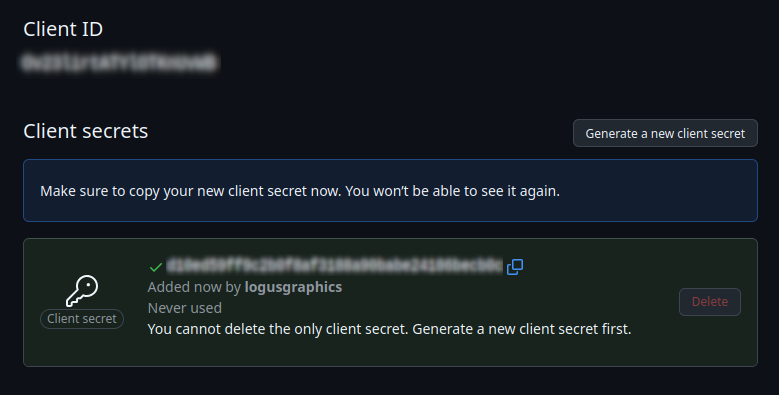
- GitHub provides the following credentials:
Step 2: Redirect User to GitHub
When a user clicks "Sign in with GitHub" in your app:
// Generate a random state for CSRF protection
const state = generateRandomString(32);
sessionStorage.setItem('oauth_state', state);

// Build authorization URL
const params = new URLSearchParams({
  client_id: 'Iv1.8a61f9b3a7aba766',
  redirect_uri: 'https://myapp.com/auth/callback',
  scope: 'user:email read:user',
  state: state,
  response_type: 'code',
});

const authUrl = `https://github.com/login/oauth/authorize?${params}`;

// Redirect user to GitHub
window.location.href = authUrl;
What the user sees: GitHub's login page (if not already logged in), then a consent screen showing what your app wants to access.
Step 3: Handle the Callback
GitHub redirects back to your callback URL with an authorization code:
// In your callback handler (e.g., /auth/callback route)
app.get('/auth/callback', async (req, res) => {
  const { code, state } = req.query;

  // Verify state matches (CSRF protection)
  const storedState = sessionStorage.getItem('oauth_state');
  if (state !== storedState) {
    return res.status(400).send('Invalid state parameter');
  }

  // Exchange authorization code for access token
  const tokenResponse = await fetch('https://github.com/login/oauth/access_token', {
    method: 'POST',
    headers: {
      'Content-Type': 'application/json',
      Accept: 'application/json',
    },
    body: JSON.stringify({
      client_id: process.env.GITHUB_CLIENT_ID,
      client_secret: process.env.GITHUB_CLIENT_SECRET,
      code: code,
      redirect_uri: 'https://myapp.com/auth/callback',
    }),
  });

  const tokens = await tokenResponse.json();
  // {
  //   access_token: "gho_16C7e42F292c6912E7710c838347Ae1781b2A",
  //   token_type: "bearer",
  //   scope: "user:email read:user"
  // }

  // Store token securely (in session, database, etc.)
  req.session.githubToken = tokens.access_token;

  // Redirect to your app
  res.redirect('/dashboard');
});
Step 4: Use the Access Token
Now you can make authenticated requests to GitHub's API:
// Fetch user information
async function getGitHubUser(accessToken) {
  const response = await fetch('https://api.github.com/user', {
    headers: {
      Authorization: `Bearer ${accessToken}`,
      Accept: 'application/vnd.github.v3+json',
    },
  });

  if (!response.ok) {
    throw new Error('Failed to fetch user');
  }

  return await response.json();
  // {
  //   login: "octocat",
  //   id: 1,
  //   name: "The Octocat",
  //   email: "octocat@github.com",
  //   ...
  // }
}

// Use in your application
const user = await getGitHubUser(req.session.githubToken);
console.log(`Welcome, ${user.name}!`);
Step 5: Handle Token Refresh (if needed)
GitHub access tokens don't expire by default, but many OAuth 2.0 providers issue refresh tokens. Here's how you'd handle refresh:
async function refreshAccessToken(refreshToken) {
  const response = await fetch('https://github.com/login/oauth/access_token', {
    method: 'POST',
    headers: {
      'Content-Type': 'application/json',
      Accept: 'application/json',
    },
    body: JSON.stringify({
      grant_type: 'refresh_token',
      refresh_token: refreshToken,
      client_id: process.env.GITHUB_CLIENT_ID,
      client_secret: process.env.GITHUB_CLIENT_SECRET,
    }),
  });

  const tokens = await tokenResponse.json();
  return tokens.access_token;
}

// Use when token expires
try {
  await getGitHubUser(accessToken);
} catch (error) {
  if (error.status === 401) {
    // Token expired, refresh it
    const newToken = await refreshAccessToken(refreshToken);
    await getGitHubUser(newToken);
  }
}
Complete Example: Express.js Integration
Here's a complete, production-ready example:
const express = require('express');
const session = require('express-session');
const crypto = require('crypto');

const app = express();

// Session configuration
app.use(
  session({
    secret: process.env.SESSION_SECRET,
    resave: false,
    saveUninitialized: false,
  }),
);

// Generate random string for state
function generateRandomString(length) {
  return crypto.randomBytes(length).toString('hex');
}

// Step 1: Initiate OAuth flow
app.get('/auth/github', (req, res) => {
  const state = generateRandomString(32);
  req.session.oauthState = state;

  const params = new URLSearchParams({
    client_id: process.env.GITHUB_CLIENT_ID,
    redirect_uri: `${process.env.APP_URL}/auth/github/callback`,
    scope: 'user:email read:user',
    state: state,
    response_type: 'code',
  });

  res.redirect(`https://github.com/login/oauth/authorize?${params}`);
});

// Step 2: Handle callback
app.get('/auth/github/callback', async (req, res) => {
  const { code, state } = req.query;

  // Verify state
  if (state !== req.session.oauthState) {
    return res.status(400).send('Invalid state parameter');
  }

  try {
    // Exchange code for token
    const tokenResponse = await fetch('https://github.com/login/oauth/access_token', {
      method: 'POST',
      headers: {
        'Content-Type': 'application/json',
        Accept: 'application/json',
      },
      body: JSON.stringify({
        client_id: process.env.GITHUB_CLIENT_ID,
        client_secret: process.env.GITHUB_CLIENT_SECRET,
        code: code,
        redirect_uri: `${process.env.APP_URL}/auth/github/callback`,
      }),
    });

    if (!tokenResponse.ok) {
      throw new Error('Token exchange failed');
    }

    const tokens = await tokenResponse.json();

    // Fetch user info
    const userResponse = await fetch('https://api.github.com/user', {
      headers: {
        Authorization: `Bearer ${tokens.access_token}`,
        Accept: 'application/vnd.github.v3+json',
      },
    });

    const user = await userResponse.json();

    // Store in session
    req.session.githubToken = tokens.access_token;
    req.session.user = user;

    // Redirect to dashboard
    res.redirect('/dashboard');
  } catch (error) {
    console.error('OAuth error:', error);
    res.status(500).send('Authentication failed');
  }
});

// Step 3: Protected route
app.get('/dashboard', (req, res) => {
  if (!req.session.user) {
    return res.redirect('/auth/github');
  }

  res.send(`
    <h1>Welcome, ${req.session.user.name}!</h1>
    <p>GitHub Username: ${req.session.user.login}</p>
    <p>Email: ${req.session.user.email || 'Not public'}</p>
  `);
});

// Step 4: Logout
app.get('/logout', (req, res) => {
  req.session.destroy();
  res.redirect('/');
});

app.listen(3000, () => {
  console.log('Server running on http://localhost:3000');
});
Security Best Practices in This Example
- State parameter: Prevents CSRF attacks by verifying the callback matches the initial request
- Server-side token exchange: Client secret never exposed to browser
- Secure session storage: Tokens stored server-side, not in cookies or localStorage
- HTTPS: All OAuth flows must use HTTPS (enforced by most providers)
- Scope limitation: Request only the minimum permissions needed (
user:email read:user)
Security Considerations and Common Pitfalls
OAuth 2.0 is powerful but can be misused. Here are critical security considerations:
1. Token Storage
Bad: Storing access tokens in localStorage or cookies
// DON'T DO THIS
localStorage.setItem('access_token', token);
Good: Store tokens server-side, use secure HTTP-only cookies for session management
// Server-side session
req.session.accessToken = token;
2. Client Secret Exposure
Bad: Including client secret in client-side code
// DON'T DO THIS (in browser code)
const clientSecret = 'my_secret_key';
Good: Client secret only used server-side, never exposed to browser
// Server-side only
const clientSecret = process.env.CLIENT_SECRET;
3. State Parameter Validation
Bad: Not validating state parameter
// DON'T DO THIS
app.get('/callback', (req, res) => {
  const { code } = req.query;
  // Missing state validation!
});
Good: Always validate state to prevent CSRF
app.get('/callback', (req, res) => {
  const { code, state } = req.query;
  if (state !== req.session.oauthState) {
    return res.status(400).send('Invalid state');
  }
});
4. Token Expiration Handling
Bad: Assuming tokens never expire
// DON'T DO THIS
const token = getStoredToken();
await apiCall(token); // Might fail if expired
Good: Handle token expiration gracefully
async function makeAuthenticatedRequest() {
  let token = getStoredToken();

  try {
    return await apiCall(token);
  } catch (error) {
    if (error.status === 401) {
      // Token expired, refresh it
      token = await refreshToken();
      return await apiCall(token);
    }
    throw error;
  }
}
5. Redirect URI Validation
Bad: Not validating redirect URIs
// DON'T DO THIS - allows open redirect attacks
const redirectUri = req.query.redirect_uri;
res.redirect(redirectUri);
Good: Whitelist allowed redirect URIs
const allowedRedirectUris = ['https://myapp.com/callback', 'https://myapp.com/auth/callback'];

if (!allowedRedirectUris.includes(redirectUri)) {
  return res.status(400).send('Invalid redirect URI');
}
OAuth 2.0 vs. OpenID Connect: What's the Difference?
You'll often hear "OAuth 2.0" and "OpenID Connect" used together. Here's the distinction:
OAuth 2.0: Authorization
Purpose: Allow applications to access resources on behalf of users
What it provides: Access tokens for API calls
Example: BudgetWise accessing your TrustBank transaction data
OpenID Connect: Authentication + Identity
Purpose: Authenticate users and provide identity information
What it provides: ID tokens (JWT) containing user identity claims
Example: "Sign in with Google" to log into BudgetWise (not just authorize API access)
How They Work Together
Most modern "OAuth 2.0" implementations actually use OpenID Connect, which extends OAuth 2.0:
%% width: desktop-60 mobile-100
graph TB
    A[OAuth 2.0] -->|Authorization| B[Access Tokens]
    A -->|Extended by| C[OpenID Connect]
    C -->|Authentication| D[ID Tokens]
    C -->|Identity| E[UserInfo Endpoint]

    B --> F[API Access]
    D --> G[User Identity]
    E --> G

    style A fill:#3b82f6,stroke:#2563eb,stroke-width:2px,color:#fff
    style C fill:#8b5cf6,stroke:#7c3aed,stroke-width:2px,color:#fff
    style B fill:#10b981,stroke:#059669,stroke-width:2px,color:#fff
    style D fill:#f59e0b,stroke:#d97706,stroke-width:2px,color:#fff
In practice: When you "Sign in with Google," you're using OpenID Connect, which provides:
- ID Token: Proves who you are (contains user info)
- Access Token: Allows the app to call Google APIs on your behalf
Conclusion: The Power of Delegated Authorization
OAuth 2.0 represents a fundamental shift in how we think about application security. Instead of applications managing user credentials (a security nightmare), OAuth 2.0 enables delegated authorization—users grant limited, revocable access to their resources without sharing passwords.
Our story of HealthCare Trust, WellnessTracker, and you illustrates the core concept: three entities working together, each with clear roles and responsibilities, to enable secure access to protected resources through trusted delegation.
Key takeaways:
- OAuth 2.0 solves the password-sharing problem by introducing tokens instead of credential sharing
- Three main actors: Resource Owner (you), Client Application (BudgetWise), and Authorization Server (TrustBank)
- Authorization Code Flow is the most secure and common flow for web applications
- Scopes enable granular permissions—grant only what's needed
- Refresh tokens allow long-lived access without repeated user authorization
- OpenID Connect extends OAuth 2.0 to provide authentication and identity information
Whether you're building an application that needs to access user data from other services, or you're implementing an OAuth 2.0 provider for your own API, understanding these concepts is essential for modern web development.
The protocol has evolved from OAuth 1.0's complexity to OAuth 2.0's simplicity, and continues to evolve with OpenID Connect, PKCE, and other enhancements. As you implement OAuth 2.0 in your applications, remember the story of HealthCare Trust and WellnessTracker: security through delegation, control through transparency, and trust through standardization.
Further Reading
Standards & Specifications:
- RFC 6749: The OAuth 2.0 Authorization Framework - The official OAuth 2.0 specification
- OpenID Connect Specification - Identity layer on top of OAuth 2.0
- RFC 7636: Proof Key for Code Exchange (PKCE) - Security extension for public clients
Implementation Guides:
- GitHub OAuth Documentation - Comprehensive guide with examples
- Google OAuth 2.0 Guide - Google's implementation guide
- OAuth.net - Community resources and best practices
Security Resources:
- OWASP OAuth 2.0 Security Cheat Sheet - Security best practices
- OAuth 2.0 Best Practices - Auth0's security recommendations
Have questions about OAuth 2.0? Found this guide helpful? I'd love to hear your thoughts and experiences implementing OAuth 2.0 in your applications.
Comments
Comments are provided via Giscus (GitHub). Enable them in your cookie preferences to load the discussion widget.